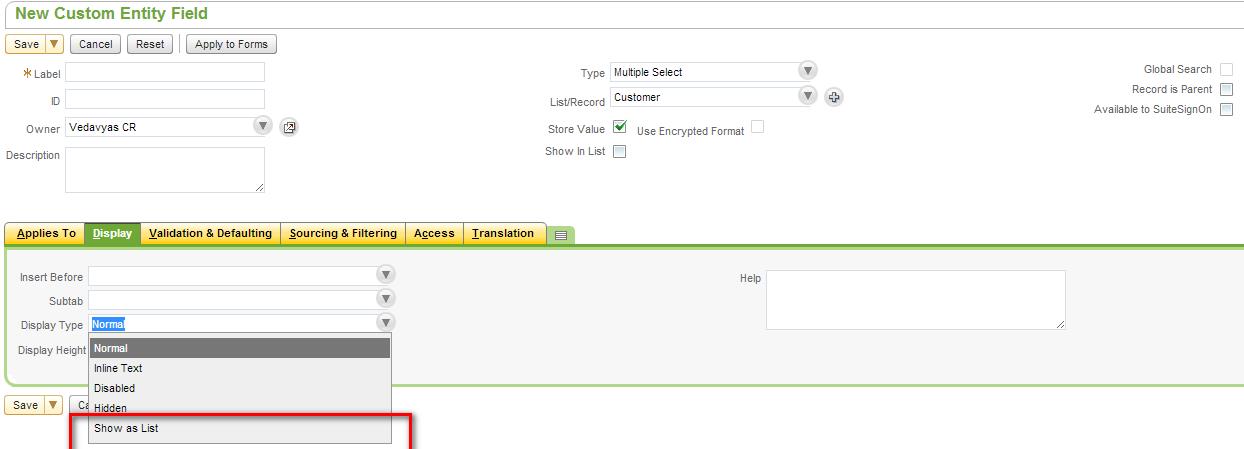
In brief Other Relationships is used to create multiple records (i.e., Vendor, Partner, Other names) form customer with the same details.
Steps to install and deploy Suite Commerce Advance SSP’s and define touch points
- Content delivery service : To create and mange content of website. This bundle is available only for Suite Commerce Advance.
- My Account : Users can track and view their orders, edit there profile information this bundles includes following.
- Profile Information.
- Address Book
- Credit Card Details
- Order History & Order Details
- Email Preferences
- Product Mechandising : Create, configure and display products based on item atributes for better user experence.

- Reference Checkout : Provides a fexible ,fast and cstomizable step by step check out process.
- Reference Shopflow : This suite app includes following.
- Intractive display like zooming, alernative views..etc
- Product listing layouts for viewing of items
- Quick View
- Product review
- Gift cards
- News letters Subscription
- Shoping Cart
- Mini Cart
Deploying SSP’s to Website:
Every bundle will have two SSP’s.
- Reference: This is locked bundle we cannot edit or customize the SSP’s.
- Custom: In custom bundle we can add edit customize the SSP’s.
Go to >> Setup >> Suite Commerce Advance >> SSP Applications
View /Edit the SSP’s need to be deployed
If we are deploying Custom SSP’s make sure that all the library files should be like Reference SSP’s
Go to >> Setup >> Suite Commerce Advance >> SSP Applications
View /Edit the SSP’s need to be deployed
If we are deploying Custom SSP’s make sure that all the library files should be like Reference SSP’s
Defining Touch Points in SSP:
Select the name and Entry page for the touch point
Once we done with the setup, mouse over on save button we get three options.
- Save & New
- Save & Deploy to Site
- Save & Deploy to Domain
Click on “Save & Deploy to Site”.
Select Site Need to Deploy:
Defining Touch Points In website Setup:
Once we deploy all the SSP’s to website we need to define touch points in website setup.
Defining Touch points to website:
Go to >> Setup >> Suite Commerce Advance >> Setup Website
Click on “Touch points” tab based on Touch points we define in SSP’s all the touch will be accessible form setup touch points
- Select the touch point.
- Select the SSP Application
- Path will be automatically displayed.
Click on save.
Topics: Customization, ECOMMERCE, NetSuite
Best practice to display Item images in suite commerce advance web store.
Step 1:
Go to >> Setup >> Suite Commerce Advanced >> Setup Website >> Click on edit
Step 2:
Click on “Advanced” tab
- Select the image domain
- Select the image folder
Creating image folder.
They are two ways are creating folders
- By clicking in “+” symbol next to image folder field
- Go to >> Setup >> Suite Commerce Advanced >> Web Hosting Files
Click on live hosting files and click on New Folder
- Image file format : Based on Item ID Delimiter and Structure Delimeter image file format will be created. Like [Item ID Delimiter]_{Category1}-{Category2}
- Item Identifer : Selet the item identifier to choose a field on item records that system can use link image files with item records.
- Note: – This can be any Diplay name, UPC Code, URL Component or any custom field type free form text
- Item ID Delimiter : The default value is an underscore (_). It is used to parse the item identifier from the image file name.
- Structure Delimiter: The default value is a double dash (–). The Structure Delimiter is used to add information to the image file.
Configuring Image for an Item:
Example : We are setting an image for an item name “Black Belt”
- Rename image to “ Black belt _0” if we have one image
- If we need to add mutiple images for an item image name format should be like below
- Image 1: Black belt _0
- Image 2: Black belt _1
- Image 3: Black belt _2
- Image n: Black belt _n
- Upload image to folder which we selected in “Image Folder”
- Now veiw the item record an image will be attached but in webstore item image will be displayed.
Updating Field set for displaying Image in Website:
- Add “Item Images(Detail)” in field sets to display item images in website.
- Please make sure that field set updated in” Itemkeymapping.js”. Path to access Itemkeymapping.js is
Web Site Hosting Files > Live Hosting Files > SSP Applications > NetSuite Inc. – Shopping > Custom ShopFlow1 > js > src > app
Topics: Customization, ECOMMERCE
Pages where Custom Fields are displayed when they are applied to the Web Site
Topics: Customization, ECOMMERCE
This issue rises for the role in which there is no custom record permission that we want to open.
- To resolve this, Go to Setup > Users/Roles > Manage Roles
- Edit the Custom role used for Importing
- Under Permissions tab, Lists Subtab, add Custom Record Entries with level set toCreate.
- In the Setup Subtab, add Import csv file with level set to full.
- Click on save
Topics: Customization, CRM