- It is the amount of work that has started on an item, but has not been delivered to a customer (or) received payment for the item.
- In a manufacturing setting, items that have been received at the factory, but have not been delivered to the customer.
- The manufacturing work in process feature tracks the Work orders through the entire production process in steps, gathering materials through assembly and stocking finished goods.

This WIP functionality adds a multi-step process with the following transactions:
- Work Order Issue: Raw materials are moving to assembly area.
- Work Order Completion: The completion transaction puts the assembly item into inventory so it is available for other transactions or fulfillment.
- Work Order Close.
Enabling WIP Feature:
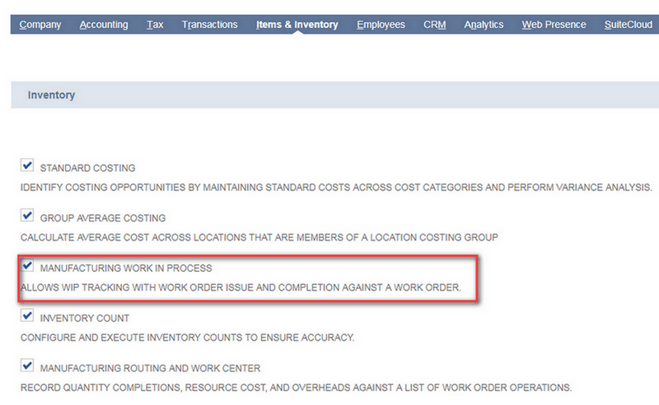
- Go to Setup > Company > Setup Tasks > Enable Features.
- Click the Items & Inventory subtab.
- Check the Manufacturing Work In Process box.
- Click Save.
- Setup items for WIP processing after enable the WIP feature.
Setup items for WIP processing:
- Go to Lists > Accounting > Items.
- Edit the existing assembly record (or) New Assembly item record.
- In this WIP process you must use Standard (or) Average costing methods.
- On the Purchase Inventory subtab, check the WIP check Box.
- Save.

Using WIP on Work Orders:
When the Manufacturing WIP feature is enabled, you can use the multi-step process to complete your item assembly.
- Go to Transactions > Manufacturing > Enter Work Orders (Administrator).
- In primary information, Check the WIP box.
- In Classification section select Location.
- Save,
After save the work order don’t follow the standard assembly build process. follow the step by step WIP process i.e.,
- Work Order Issue :
- The issue transaction not only issues component parts to the work order, but takes cost out of inventory and transfers it to the WIP account associated with the assembly item on the work order.
- The work order issue indicates the material is consumed against the work. Issue assembly member components to track material consumption.
- Go to Transactions > Manufacturing > Issue Components (Administrator).
- If you use a OneWorld account, select a Subsidiary from the drop down list.
Note: If you use the Multiple Units of Measure feature, the issued component quantity is recorded in base units.
Issue Components for an Individual Work Order:
- Go to Transactions > Manufacturing > Enter Work Orders > List (Administrator).
- Click View next to the work order you want to issue components for.
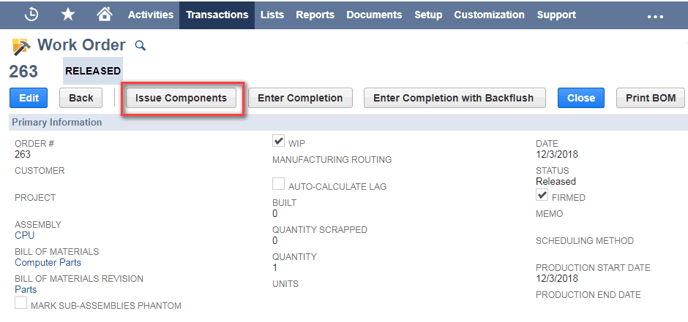
- Click the Issue Components button.
 2. Work Order Completion:
- The completion transaction puts the assembly item into inventory so it is available for other transactions or fulfilment.
- This transaction indicates the number of finished goods produced.
- Suppose you can choose the work order completion with backflush to fulfill the both tasks i.e., issuing components & Completing the assembly at one time.
Entering work order Completion:
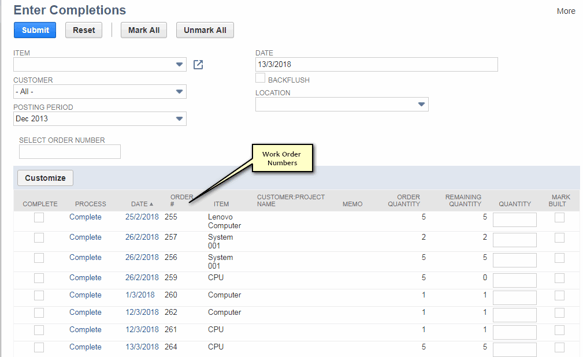
- Go to Transactions > Manufacturing > Enter Completions.
- Select location, Item & verify the posting period.
- Check the Backflush box to enter the components with backflush. Using Backflush to fulfill the issuing components & Completing the assembly at same time.
Enter a Completion for an Individual Work Order:
- Go to Transactions > Manufacturing > Enter Work Orders > List.
- Click View next to the work order you want to complete.
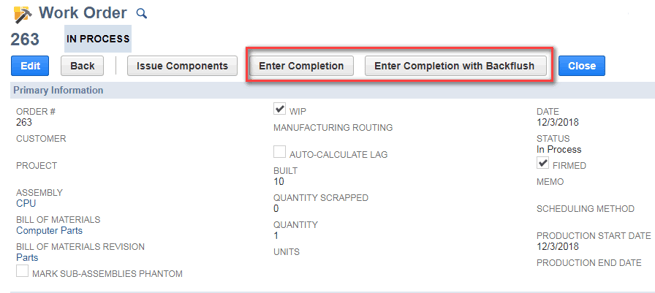
- Click the Enter Completion (or) Enter Completion with backflush button.
- If you are entering a completion with backflush, verify or enter the Completed Quantity of each component consumed.
- Save.
 3. Work Order Close :
- The close transaction is review the cost variances before accepting that a work order is closed and locking in the costs associated with it.
- When you use the Manufacturing Work In Process (WIP) feature, you can enter a work order close to finalize the accounting for that order.
- Go to Transactions > Manufacturing > Close Work Orders.
- Select Location, Item, order from & to Date.
- Check the Close box which work order you want to close.
- Click Submit.
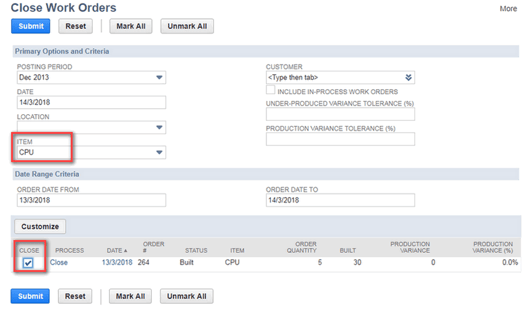
Enter a Close for an Individual Work Order:
- Go to Transactions > Manufacturing > Enter Work Orders > List.
- Click View next to the work order you want to close.
- Click the Close button.
- Complete additional fields on the Work order Close page as necessary.
- Click Save.

For this context, it is way to describe the flow of manufacturing costs from one area of production to the next, and tracks the Work orders through the entire production process in steps, gathering materials through assembly and stocking finished goods.
























 Twitter
 Linkedin
 Youtube
 Google +
 Face Book