Case management deals with the issues/concerns raised by the customers on any specific item or services provided by the respective company. Customers can raise the cases from Online Case Form, Case Capture and Customer Centers or NetSuite support reps can enter the cases in NetSuite on behalf of the customer. Cases created in NetSuite will be assigned to the support reps based on the case rules setup. Communication for each support case can be tracked under the respective case record.
NetSuite Setup: To manage the cases admin/support managers should create case types, case origin types. and issue types. Next, to assign cases to support reps automatically, create the case rules and territories.
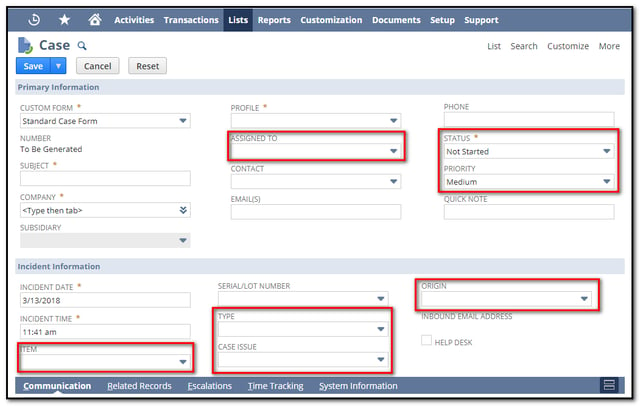
Before using the Case management feature setup the following Records
Case Types: case type helps the support employees to find the what type of issue/concern a customer is facing and a case about.
For example, Company X creates a case type called Request. Customers/Employees will be able to select the case type as Request while creating/updating the Cases in NetSuite.
NetSuite by default provides below case types
- Concern
- Problem
- Question
To create a case type: Go to Setup > Support > Setup Tasks > Case Types > New (Administrator).
To edit or Inactive any existing case type, go to Setup > Support > Setup Tasks > Case Types
Case Origins: A case origin types are how a customer created the case, this will help the support reps to know how each case was created.
For example, Company X creates case origin type called online and when a customer creates a case from Online, case record can be tracked online in the case origin field.
Netsuite default provides below case origin types
- Phone
- Web
- Other
To create a new case origin: Go to Setup > Support > Setup Tasks > Case Origin Types > New.
To edit or Inactive existing case Origin types, go to Setup > Support > Setup Tasks > Case Origin Types
Case Statuses: Case Statuses represents the status/stage of the New/Existing cases in Netsuite
Netsuite default provides below case statuses
- Not Started
- In Progress
- Escalated
- Re-Opened
- Closed
To create a case status: Go to Setup > Support > Setup Tasks > Case Statuses > New.
To edit or Inactive a case status go to Setup > Support > Setup Tasks > Case status
Case Priorities: Case Priorities represents the importance of the case. It helps the support employees to solve the cases first.
For example, Company X creates case priorities 1,2,3,4,......10. While raising a case record customer or support employee give the priority rankings for a case. Then it will be easy for the support reps to solve or answer the cases according to the ranking wise.
To create a case priority: Go to Setup > Support > Setup Tasks > Case Priorities > New (Administrator).
To edit or Inactive a case priority go to Setup > Support > Setup Tasks > Case priority
Case Issues: It is a type of issue you want to list in the support issue reporting by your customers. it helps the support employees to find the what issue a case about. Each individual item has different types of issues
For example, Company X creates a case issue called Login, When a customer faces an issue on Login, Then customer selects the Login in the issue field in the case record.
To create a case issue: Go to Setup > Support > Setup Tasks > Case Issues > New (Administrator).
To edit or Inactive a case issue go to Setup > Support > Setup Tasks > Case issue
Offer Support for Items: Selected items only can offer Support. It helps to improve the loading accuracy of case record and filter the items in the case record.
For example, Company X created items Monitor, CPU, Keyboard. But the company wants to offer the support only for Monitor and CPU items, Then in Item record check the offer support checkbox under the preferences subtab for Monitor and CPU records
You can offer support only for following item types :
- Inventory
- Assembly/Bill of Materials
- Kit/Package
- Non Inventory items for sale or resale
- Other charge items for sale or resale
- Service items for sale or resale
Support Groups: You can make the employee’s type group and designate them as a support group to assign cases to the group and manage the events.
Simultaneously to the group calendar is also created for the group. When you invite the group to events, everyone with access to your account can view the group's events on the group calendar. Members can accept the invitation to the event. And also members can view the calendar in the personal NetSuite calendar
To create a support group: Go to Lists > Relationships > Groups > New. Select static and Enter the name for the group in a name field, Select employee in the type field, Check the Support Group box, Add the members to the group in the Members subtab
Marking Employees as Support Reps: Check the Support Rep box in the employee record to add the employee in Assigned To Field list in the case record.
Go to Lists > Relationships > Groups > New.
Click edit next to the Employee you want to mark as a support rep, Under the Human Resources subtab check the Support Rep box and click save
By using Case Type, Case Origin, Case Status, Case Priority, Case Issues, Assigned To, Item Setup we can track the Case record and find the details of the case raised.


















 Twitter
 Linkedin
 Youtube
 Google +
 Face Book