In Workflow each state contains actions. The actions used in a workflow depends on the type of business processes need to be automated by the workflows. Workflow actions are the tasks that are performed by the workflow depending on the properties that we assign.Each state has one or more actions, and all actions contains the elements like properties, triggers and conditions.
ACTION TYPES:
Workflow contain 17 action types as shown in below
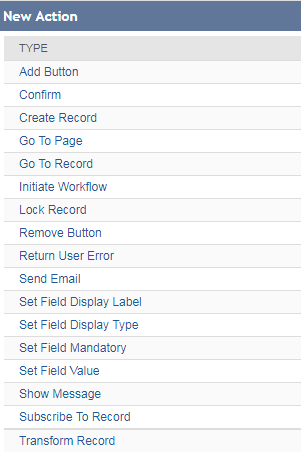
ADD BUTTON:
By using this action type user can add custom button on a record form, the Add Button action is used to create a button that transitions the record to the next state in a workflow or navigate to another page or record.
To add a new button Go to New Action in Workflow page and choose Add Button
The following figure shows the Add Button action properties:
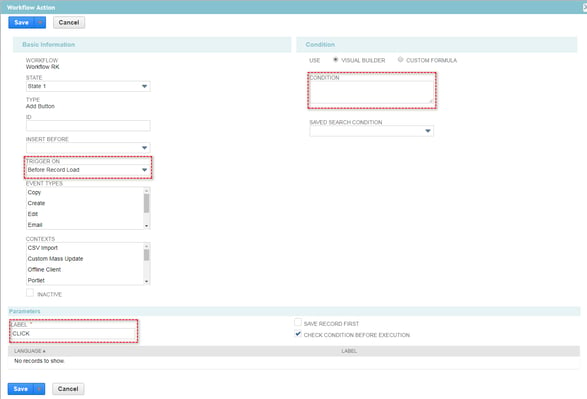
2. In the Trigger On field choose either Client or Server side triggers and below are the triggers drop down list
- Entry: Action triggers when the record enters a state for the first time in a workflow
- Exit: Action triggers when the record exits the state for the first time
- Before Record Load: Action takes place just before the record is loaded. When the user clicks on view, create or edit mode and before the record loads the action will be triggered
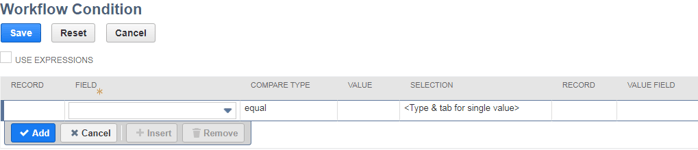
3. Using Conditions you can restrict or execute the actions, and also user fields in conditions to check the user, role, subsidiary, transactions and custom forms
4. Click On Save
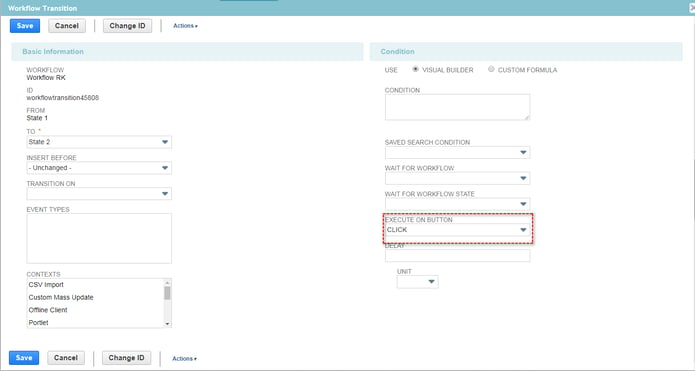
5. Select the transition arrow between two states and click the Edit icon on the transition
6. In transition select the button you created in execute on button dropdown list and click on save
CONFIRM
By using this action type user can display a popup message with OK and Cancel buttons.
To create a confirm action go to New Action and click on CONFIRM and the Confirm action form page will open.
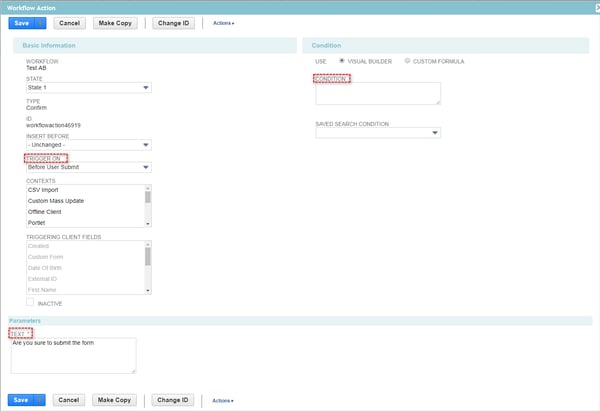
1. In the Text field enter the text message.
2. In the Trigger On field choose Client triggers and below are the trigger on drop down list
- Before Field Edit:This trigger takes place before a user completes changes to a field on a record form
- Before User Submit:This trigger takes place after the user saves the record and before the record submit trigger executes
3. Using Conditions you can restrict or execute the actions, and also user fields in conditions to check the user, role, subsidiary, transactions and custom forms.

4. Click On Save
GO TO PAGE
By using this action type user redirects to specific page, Pages in NetSuite to which you can redirect include list views or reports
To create a confirm action go to New Action and click on CONFIRM and the Confirm action form will open
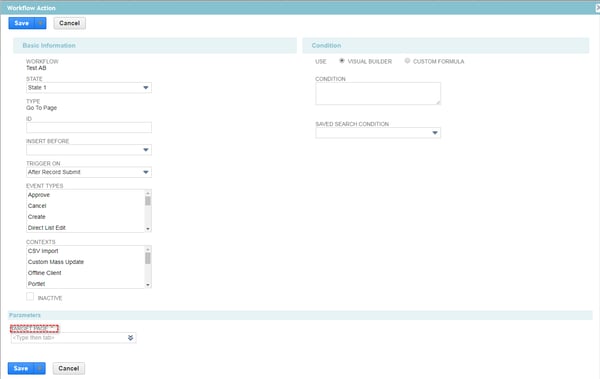
2. In the Trigger On field choose either Client or Server side triggers and below are the trigger drop down list
- Entry: Action starts triggering when the record enters a state for the first time in a workflow
- Exit :Action starts triggering when the record exits the state for the first time
- After Record Submit: Action takes place only after the submission of the record
3. Using Conditions you can restrict or execute the actions, and also user fields in conditions to check the user, role, subsidiary, transactions and custom forms
4. Click on Save
GO TO RECORD:
By using this action type users redirects to a specific record. To create go to record action go to new action and choose Go To Record action
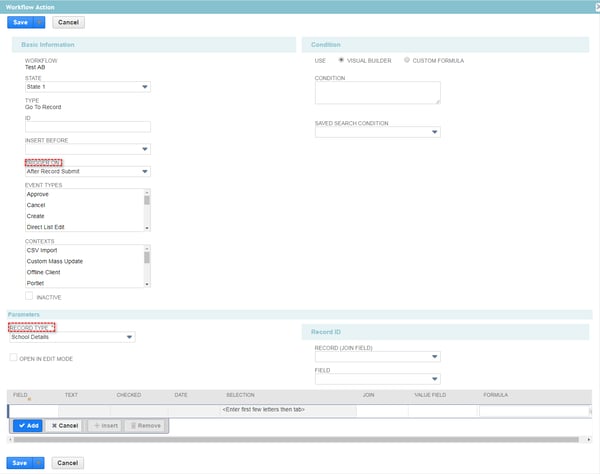
2. Check Open In Edit Mode if the chosen record has to open in edit mode
3. In the Trigger On field choose Server side triggers and below are the trigger on drop down list
- After Record Submit: Action takes place only after the submission of the record
- Entry: Action starts triggering when the record enters a state for the first time in a workflow
- Exit: Action starts triggering when the record exits the state for the first time
4. Using Conditions you can restrict or execute the actions, and also user fields in conditions to check the user, role, subsidiary, transactions and custom forms

INITIATE WORKFLOW
By using this type user can Initiate another workflow instance from the current workflow instance. It is mainly used so that we can have multiple workflows at the same time. Both the workflows will run on the same record.
To create Initiate workflow action go to new action and choose Initiate Workflow
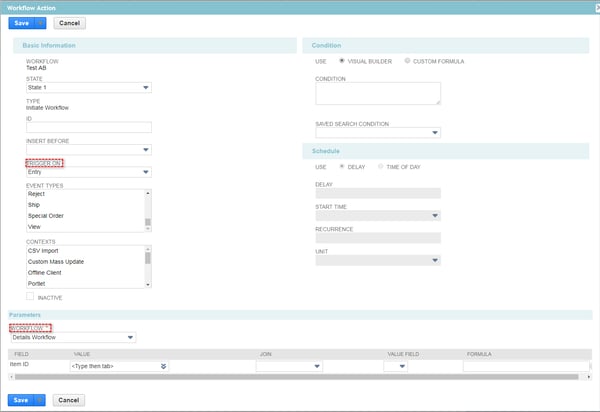
2. In the Trigger On field choose either Client or Server side triggers and below are the trigger on drop down list
- Entry: Action starts triggering when the record enters a state for the first time in a workflow
- Exit: Action starts triggering when the record exits the state for the first time
- Before Record Load: Action takes place just before the record is loaded. When the user clicks on view, create or edit mode and before the record loads the action can be triggered
- Before Record Submit: This action takes place just after the record is saved and just before the record is entered into the database
- After Record Submit: Action takes place only after the submission of the record
- Scheduled: This enables a workflow to initiate according to the schedule the user prefers. Actions and transition will take place as per the schedules


 Twitter
 Linkedin
 Youtube
 Google +
 Face Book