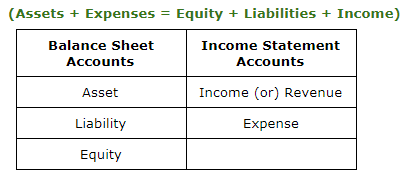
A chart of account (COA) is a financial tool that provides a complete listing of every account in accounting system. In NetSuite, you can use the CSV import assistant to import the account information (or) you can create account records manually in NetSuite. The Chart of Accounts is an excellent a way to record all of these transactions for asset, income (or) revenue, expense, liability, equity.
If you earn money it will be recorded in an income account. If you buy business supplies, that transaction will be recorded in an expense account. There’s even an account for liabilities such as mortgages or loans.
Within the chart of accounts you will find the accounts wise listed in the following order.
Using Account Numbers: Most of the business es are using standard account numbers and names. So, you can set up account numbers in your chart of accounts.
Enable account numbers:
- Go to Setup > Accounting > Preferences > Accounting Preferences.
- Click the General subtab, check the Use Account Numbers box.
- Click Save.
Standard Numbering for Chart of Accounts:
NetSuite suggests the below Numbering format for Chart of Accounts but user can provide his/her own numbering format based on the business requirements:
- 1xxx - Asset accounts
- 2xxx - Liability accounts
- 3xxx - Equity accounts
- 4xxx - Income accounts
- 5xxx - Cost of Goods Sold (COGS) accounts
- 6xxx - Expense accounts
- 8xxx - Other Income accounts
NetSuite Account creation process:
You can use the CSV import assistant to import the account information (or) you can create account records manually in netsuite.
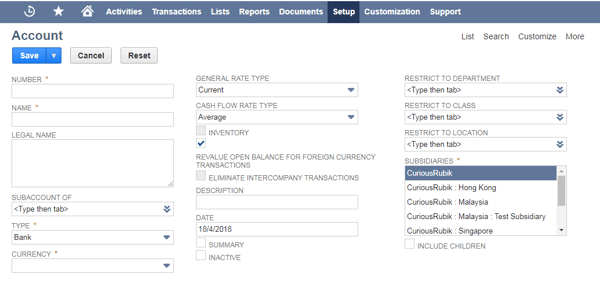
1. Create Chart of Accounts Manually.
- Go to Setup > Accounting > Manage G/L > Chart of Accounts > New.
Key Considerations:
- Account Number: If you are using account number enter the number. Numbers can be alphanumeric with a maximum of 60 characters.
- Account Name: Enter the name for account, this name is appears on Chart of Accounts, transaction lists, reports.
- Suppose, if you use legal name in account accounting preference is enabled at Setup > Accounting > Preferences > Accounting Preferences. In this field you enter 400 characters including special characters.
- Sub-account of: To make this account the sub account of another, select the parent account in the Subaccount of field.
- Account Type: Netsuite has several account types (income, Expense, equity, etc..) that are applied to your each individual account.
- If you are using one world account select subsidiary.
- If the Multiple Currencies feature is enabled and the Account Type is Bank, select a currency to associate with the account. (For other types of accounts, this field defaults to the base currency.)
- If you are using NetSuite OneWorld, you can enter opening balances only after you have created accounts.
- Summary: Summary accounts are useful to create a in active parent account that has child accounts are active. Summary accounts can not have opening balances & you can not post additional transactions in this account. Summary accounts appear with their children in the chart of accounts list. You cannot merge a summary account into another account.
- Save
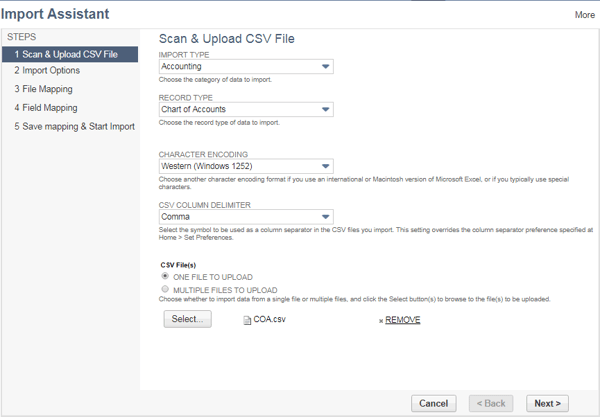
2. Import Chart of Accounts.
Step 1: Navigating to the Import Page
- To get to the budget import page, simply go to Transactions > Financial > Set Up Budgets > Import.
- You will have to select the character encoding for your spreadsheet, and upload your CSV file into the system. Once you have done this, click on the “Next” button.
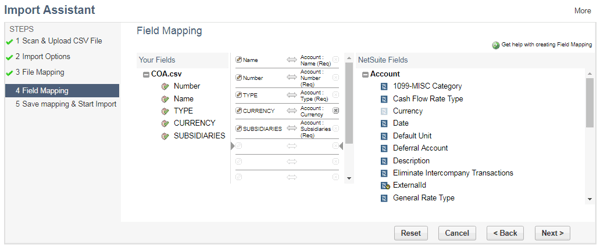
Step 2: Mapping Your File Import Fields
To ensure your data imports correctly, you will want to map the following fields:
Name, Number, Subsidiary, Type, Currency etc..
Step 3 : Reviewing the Import Mappings:
Once you’ve imported your account, you can view it at Setup> Accounting> Chart of Accounts>list and choose the appropriate account from the list.
Changing Names of Ledger Accounts:
You can change the name of an account by clicking its Edit link on the Chart of Accounts page.
- Go to Setup > Accounting > Chart of Accounts.
- Click Edit next to the account to rename.+
- Enter up to 31 characters in the Name field
- Enter up to 30 characters in the Description field.
- Save.
Adding or Changing Account Numbers:
- Go to Setup > Accounting > Chart of Accounts.
- Click Edit next to the account to rename.
- On the Edit Account page, enter the number you want to use in the Number field.
- Click Save.
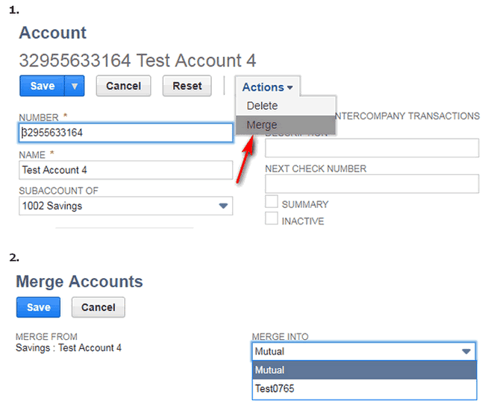
Merging Accounts:
- It is used to combine all the transactions from one account to another.
- You can merge one account into another if they are the same account type.