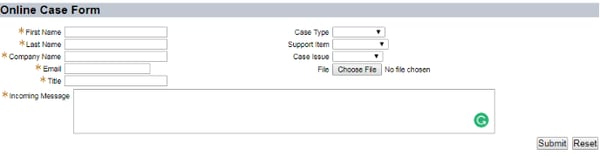
Online Forms is an interactive system that will help customers submitting a case online with required details to know about the case. Online case forms helps customers in submitting cases online for their requested services.
In Netsuite two types of online case forms can be created
- Default Form Template
- Custom HTML Template
On creation of online case form an external URL will be created which you can use in your websites or applications. On click of the URL it redirects to the online case form you created.
To create an online case form:
Go to Setup > Support > Case Management > Online Case Forms > New.
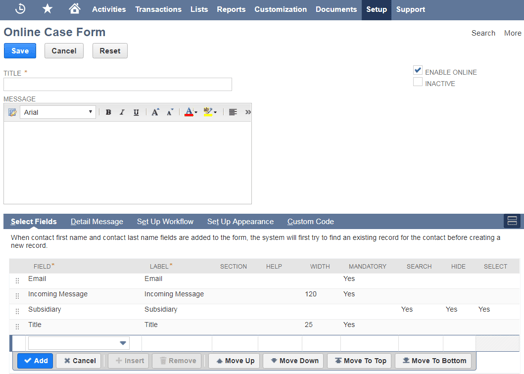
- Enter Enter a title for online case form you are creating which will be displayed on top of the form.
- Enter message in message field that appears on top of the form to customers.
- You can insert hyperlinks in the message which on click will be redirected to that pages.
- Enter message in Detail Message field that appears on the bottom of the form.
- Check the Enable Online box if you want to use this form online.
To create an online case custom fields:
Fields which you wanted to display in online case form needs to be created in system to use them in Online case forms template.
Go to Setup > Customization > List,Records,Fields> CRM Fields > New.
- Enter Name for that field
- Select field type which you want to apply
- Check case checkbox under applies tab to display that field in cases.
Selecting Fields: On the select fields subtab in the field column you can select fields which you want to include in the form.
- You can define width for each field.
- Check mandatory check box if that field is mandatory.
- Check Hide checkbox if you want to hide that field
- If the field type is list then select check box is automatically checked. If you don’t want to use as list uncheck that check box.
- You can define section for each field , all the fields under that section will be grouped and displayed in one section.
Determining Workflow: Enter the details for Preferences, Notifications and Additional Notifications.
Preferences:
- Create Customers As Companies : If you check this checkbox customers will be created as companies by default and if you uncheck it they will be created as individual customers.
- Default Subsidiary: Select the subsidiary which needs to defaulted for new customers.
- Default Case Profile: Select the case profile which needs to assigned for online cases.
- Redirect To URL: Enter the URL to which user needs to redirect after submitting the case.
- SEND AUTO-REPLY EMAIL: Select the template needs to be used for auto reply emails on submitting cases .
To create an Set Case Origin fields
Go to Setup > Support > Case Origin Types> New
- Enter Name for that field
- Select insert before field type
Setup Appearance: Select the preferences for Number of Columns shown, Colour Theme, Font, Button Alignment and Form Logo.
Online case forms helps customers submitting cases online for their service requests, you can build form according to the template required and preferences for cases submission, assigning cases with case profiles and you can define auto reply email templates and redirect URL’s on case submission